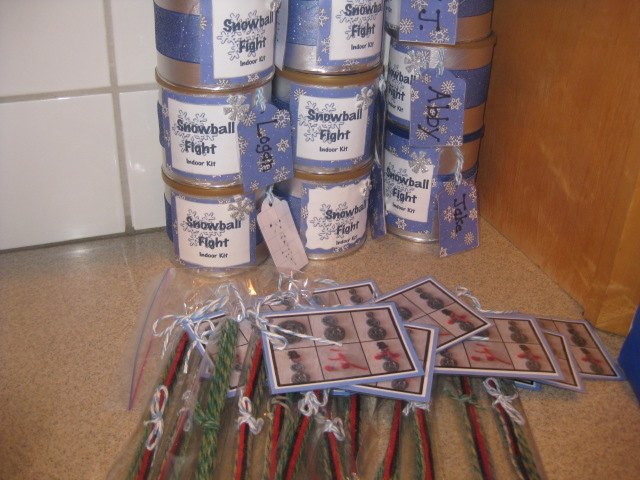
I've been wanting to add this post to my blog for a couple weeks now. For Little Man's third birthday party I wanted to make a couple of homemade party favors rather than give the kids a bag of junk from the dollar store. I found a cute gift idea on Pinterest- go figure- of a "snowball fight in a can". I was able to get a bunch of small sized formula cans from a friend and I used those to hold the snowballs (yarn pom poms). I made 4 snowballs for each can since most of our guests were siblings they would have 8 snowballs. For my guests who came without siblings I put 5 snowballs in their cans. I decorated removed the formula brand labels from the can using hot water. I used some snowflake scrap book paper, ribbon and some snowflake stickers. I had a "tag punch" son I punched name tags and added one for each guest. I also cut out circles from the scrap book paper to glue to the lids to cover the formula brand stamp on them. They came out pretty cute. *Note I started these projects three weeks prior to the party so I would have time to complete them- LOL.
The second favor was a homemade wikki stix/ bendaroos type of craft. Using a recipe I found on the internet I cut and waxed my own yarn to make individual snowman craft kits. This turned out to be a little more time consuming than I originally thought. I measured and cut all the strings to make them even then bundled them together with a little bow and placed the entire set into a pretzel bag (from Joanns). After making the wax sticks, I took pictures step by step of how to build a snowman then I put together a little tag for each set. On the back of the tag a put a little thank you note to each guest for joining us and encouraged them to use the stick to build a snowman, make letters, numbers or anything else they could think of. I included extra sticks in the kits by the way. The snowman really only needed about 6 sticks to create; but I included about 14 sticks in each kit. One party guest even posted a picture of their finished product (A kitty cat) on Facebook. So if you are interested I have included a step by step picture tutorial of this process below.
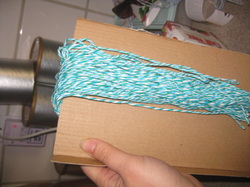
First I measured a card board piece about nine inches long and I wrapped the yarn around the board until I had enough strands. (My intention was to end up with 8 inch waxed sticks- my process taught me that this cardboard should be longer for my dipping technique- several of the sticks didn't make it to 8 inches). I cut the bottom of all the strings.

I lined my crock pot with aluminum foil (which later I took out because it was just a pain and slowed the process. Here I took a toilet wax ring (found at Home depot) and one bar of parrifin wax (found at my Albertson's 4 bars in the box) and melted them together in my crock pot. I took out the plastic piece from the toilet wax ring after the wax melted.
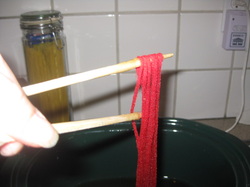
I placed my first batch of yarn strings over a pen to dip them in the melted wax.-- I found in the end a chopstick worked better and I used the second chop stick to separate the strings while they were hanging on the first chopstick over the crockpot dripping the excess wax.

Here is the wax all melted and the aluminum foil out of the crockpot (I took it out very early on because the wax just wasn't really melting. Someone on line suggested a crockpot liner but I couldn't find one at my Albertsons and I just wanted to get this done. So this was a shot of the waxes being mixed.
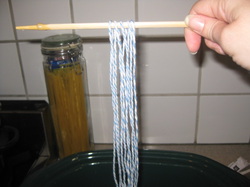
The strings on the chopstick about to be submerged into the wax.
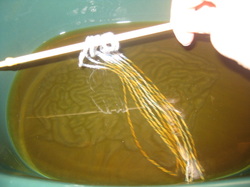
Dipping the yarn strings in. Here is where I learned that if I had made the strings longer I would have had more 8 inch final products. OR if I had dipped them deeper (closer to the chopstick) but it was a little awkward hold the chopstick and dipping the yarn that really wanted to float. I found using a second chop stick I could push them down into the wax but then they were REALLY covered.
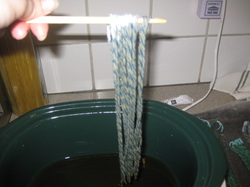
After they were dipped I let them hang over the crock pot for a few seconds to drip off excess wax. I used the second chopstick to comb between the strands as well to separate them to straighten any strands that were crossed over other strands.
Here
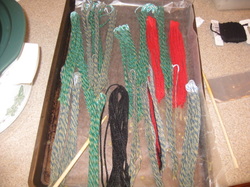
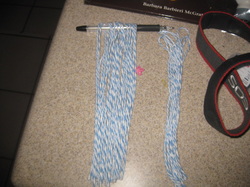
As each bunch was finished I laid them on a baking sheet lined with wax paper to dry (about 30 mins or so). Once they were dry I cut the tops of the bundles as well to make two piles of strings. Then I laid them on the counter a few at a time and measured them to 8 inches and cut them :) That was the most time consuming part as there were over 150 to cut. (I kept making them until my wax was used up so 1 toilet bowl wax ring + 1 bar of parrafin wax can make approximately 150 wax sticks - just FYI) By the way I think the reason you need the two different waxes is because the parrafin wax would dry to hard/ brittle and when you bent the sticks the wax might crack.
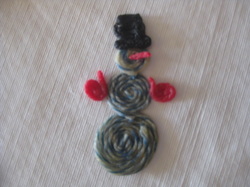
Next I took pictures of each step as I constructed my snowman- (here is the final product) to make the tutorial cards. I used two for his bottom, one and a half for his middle and one for his head. I used one strand of red for his hands and nose each hand is one fourth of a strand and his nose was about a quarter inch. Then I used one black strand for the hat. So simple and so cute.
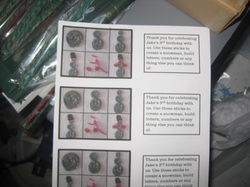
Here are the tutorial cards and the thank you notes that I printed out to attach to each kit. I cropped individual pictures and pasted them all into a table in word to make them the same size. Then I added the lines between the pictures using the shape tool and finally thickened the border around the outside. The final product looked very professional.
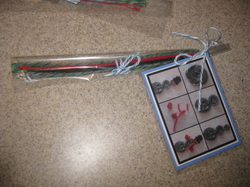
Here you can see a finished product with the little card attached. After I printed off the cards I glued them to a piece of blue scrab book paper. I put the Snowman tutorial on one side and the Thank you note on the other side. Then I laminated the cards, hole punched them and attached with a matching piece of yarn.


 RSS Feed