The Princess is using the You Can Read program from 1+1+1=1 so one of her activity trays are the printables from this program. I also have a generic word work tray as well. I have a popcorn game set up, the word puzzles and the tiles for building the words from the You Can Read and The Moffat Girls site has some add on to the You Can Read Program that she sells. One is a freebie which is the word caterpillar. So I have the new sight word 'caterpiller' pieces on that tray as well. What I am finding is The Princess is way ahead of where I am in this program. I plan to do a site word assessment soon to see how many of the 100 high frequency words she knows. I'm guessing she knows at least half. She is already reading number words, color words, CVC words and a few of the sight words. It is amazing to me how she has taken to reading like a fish in water. She has already read through the first three BOB books, the set of beginning Bob readers and a set of decodables from Scholastic.
This week our focus is on Valentine's Day. I found a cute I Love Trucks pack at mamasmonkeys. I've decided my husband is right, Valentine's Day is for girls. Everything is pink and red, it's all hearts and so girlie. Little Man LOVES anything with wheels so I am so thankful for some Valentine's Day truck printables. We have numerous trays now because I have the Princess with us on Mondays and Fridays so I make trays for her as well as for Little Man. I used to put all our activities out on the trays but it is just too much now with both sets. So most art related things are not on the trays since I take that out as we use it. Some of the practice printables we use also are not on the trays. So be sure to check back with us on Sunday that is when I post about our week as a whole. The Princess is using the You Can Read program from 1+1+1=1 so one of her activity trays are the printables from this program. I also have a generic word work tray as well. I have a popcorn game set up, the word puzzles and the tiles for building the words from the You Can Read and The Moffat Girls site has some add on to the You Can Read Program that she sells. One is a freebie which is the word caterpillar. So I have the new sight word 'caterpiller' pieces on that tray as well. What I am finding is The Princess is way ahead of where I am in this program. I plan to do a site word assessment soon to see how many of the 100 high frequency words she knows. I'm guessing she knows at least half. She is already reading number words, color words, CVC words and a few of the sight words. It is amazing to me how she has taken to reading like a fish in water. She has already read through the first three BOB books, the set of beginning Bob readers and a set of decodables from Scholastic.
1 Comment
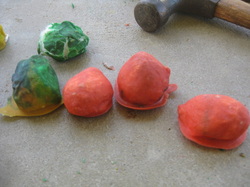 The things you find on Pinterest! Letter B week so we went with it... Baked cotton Balls. I found them at playcreatexplore.com. These actually were very easy to make, and a lot of fun to play with. To make them we mixed 1 cup of flour with 1 cup of water. Then we divided the mix into four small bowls and added several drops of food coloring to each bowl. We mixed each little bowl. Next we sprayed our cookie sheet with Pam. Then we dipped each cotton ball into a bowl completely covering it in the mixture then placing it on the cookie sheet. If you touch them together on the cookie sheet you can create shapes. You can see my "J" below. I put them in the oven on 300 degrees for about 45 mins. Took them out let them cool for a few minutes and took them out side to explore. First I gave Little Man his play hammer to bang on them but it wasn't heavy enough (they are pretty hard). They just shot all over the place. Next I got the big hammer out of the garage; but after about 2 minutes I was sure Little Man was going to smash his toes, or hit himself with the hammer so I put it up and we decided to step and stomp on them. We were rewarded with a glorious crunching sound! Little Man was so delighted. We looked at them after they were smashed and investigated the inside which was still soft and fluffy. So we talked about hard and soft. Here is the whole event as caught on camera- enjoy. The
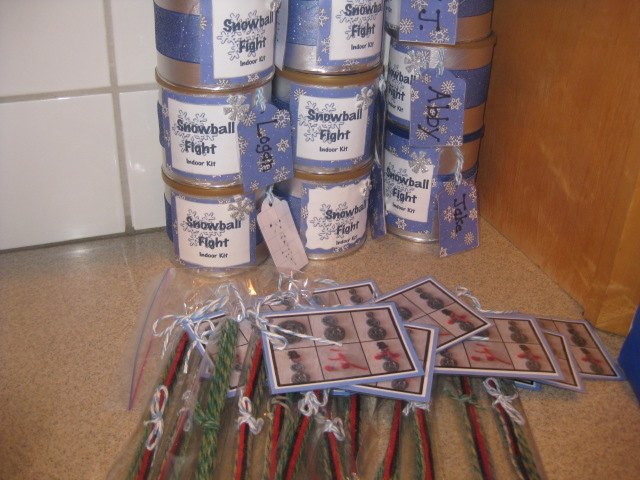
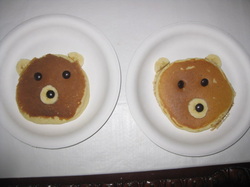 We had such a fun week learning about Bears. Our focus book was Eric Carle's Brown Bear, Brown Bear. We culminated the week with bear shaped pancakes (gotta love Pinterest) on Friday morning. The kids picked off the M&M's and banannas and just ate the pancakes. I must have the weirdest kids because when I make 'cute' food they don't really want to eat it-LOL. We also made baked cotton balls, yep you read that right, and we completed a cute (EASY) craft of a bear in his den. Enjoy the slide show to see all the beary fun activities we enjoyed this week. Be sure to check out 1+1+1=1, preschool corner and the TGIF Linky Party to see what others are doing this week. I've added a Follow me on twitter button if you'd like to follow our journey. I've been wanting to add this post to my blog for a couple weeks now. For Little Man's third birthday party I wanted to make a couple of homemade party favors rather than give the kids a bag of junk from the dollar store. I found a cute gift idea on Pinterest- go figure- of a "snowball fight in a can". I was able to get a bunch of small sized formula cans from a friend and I used those to hold the snowballs (yarn pom poms). I made 4 snowballs for each can since most of our guests were siblings they would have 8 snowballs. For my guests who came without siblings I put 5 snowballs in their cans. I decorated removed the formula brand labels from the can using hot water. I used some snowflake scrap book paper, ribbon and some snowflake stickers. I had a "tag punch" son I punched name tags and added one for each guest. I also cut out circles from the scrap book paper to glue to the lids to cover the formula brand stamp on them. They came out pretty cute. *Note I started these projects three weeks prior to the party so I would have time to complete them- LOL. The second favor was a homemade wikki stix/ bendaroos type of craft. Using a recipe I found on the internet I cut and waxed my own yarn to make individual snowman craft kits. This turned out to be a little more time consuming than I originally thought. I measured and cut all the strings to make them even then bundled them together with a little bow and placed the entire set into a pretzel bag (from Joanns). After making the wax sticks, I took pictures step by step of how to build a snowman then I put together a little tag for each set. On the back of the tag a put a little thank you note to each guest for joining us and encouraged them to use the stick to build a snowman, make letters, numbers or anything else they could think of. I included extra sticks in the kits by the way. The snowman really only needed about 6 sticks to create; but I included about 14 sticks in each kit. One party guest even posted a picture of their finished product (A kitty cat) on Facebook. So if you are interested I have included a step by step picture tutorial of this process below. 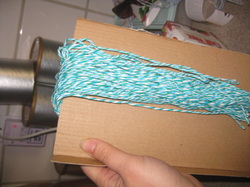 First I measured a card board piece about nine inches long and I wrapped the yarn around the board until I had enough strands. (My intention was to end up with 8 inch waxed sticks- my process taught me that this cardboard should be longer for my dipping technique- several of the sticks didn't make it to 8 inches). I cut the bottom of all the strings. 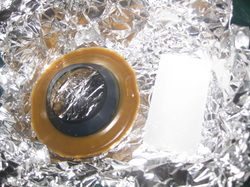 I lined my crock pot with aluminum foil (which later I took out because it was just a pain and slowed the process. Here I took a toilet wax ring (found at Home depot) and one bar of parrifin wax (found at my Albertson's 4 bars in the box) and melted them together in my crock pot. I took out the plastic piece from the toilet wax ring after the wax melted. 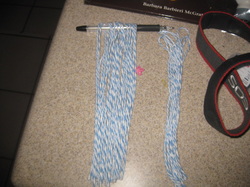 I placed my first batch of yarn strings over a pen to dip them in the melted wax.-- I found in the end a chopstick worked better and I used the second chop stick to separate the strings while they were hanging on the first chopstick over the crockpot dripping the excess wax. 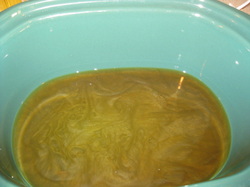 Here is the wax all melted and the aluminum foil out of the crockpot (I took it out very early on because the wax just wasn't really melting. Someone on line suggested a crockpot liner but I couldn't find one at my Albertsons and I just wanted to get this done. So this was a shot of the waxes being mixed. 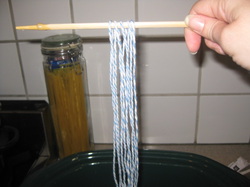 The strings on the chopstick about to be submerged into the wax. 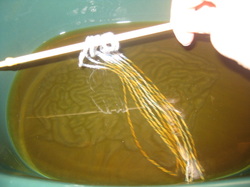 Dipping the yarn strings in. Here is where I learned that if I had made the strings longer I would have had more 8 inch final products. OR if I had dipped them deeper (closer to the chopstick) but it was a little awkward hold the chopstick and dipping the yarn that really wanted to float. I found using a second chop stick I could push them down into the wax but then they were REALLY covered. 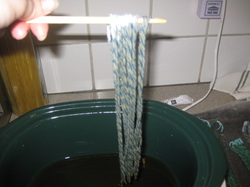 After they were dipped I let them hang over the crock pot for a few seconds to drip off excess wax. I used the second chopstick to comb between the strands as well to separate them to straighten any strands that were crossed over other strands. 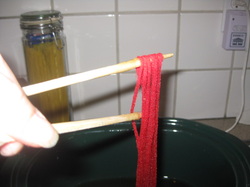 Here 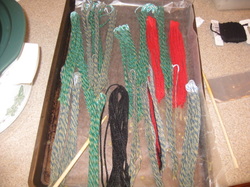 As each bunch was finished I laid them on a baking sheet lined with wax paper to dry (about 30 mins or so). Once they were dry I cut the tops of the bundles as well to make two piles of strings. Then I laid them on the counter a few at a time and measured them to 8 inches and cut them :) That was the most time consuming part as there were over 150 to cut. (I kept making them until my wax was used up so 1 toilet bowl wax ring + 1 bar of parrafin wax can make approximately 150 wax sticks - just FYI) By the way I think the reason you need the two different waxes is because the parrafin wax would dry to hard/ brittle and when you bent the sticks the wax might crack. 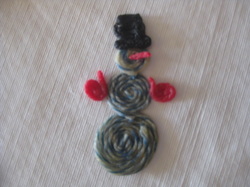 Next I took pictures of each step as I constructed my snowman- (here is the final product) to make the tutorial cards. I used two for his bottom, one and a half for his middle and one for his head. I used one strand of red for his hands and nose each hand is one fourth of a strand and his nose was about a quarter inch. Then I used one black strand for the hat. So simple and so cute. 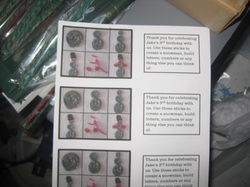 Here are the tutorial cards and the thank you notes that I printed out to attach to each kit. I cropped individual pictures and pasted them all into a table in word to make them the same size. Then I added the lines between the pictures using the shape tool and finally thickened the border around the outside. The final product looked very professional. 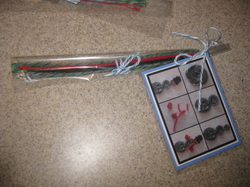 Here you can see a finished product with the little card attached. After I printed off the cards I glued them to a piece of blue scrab book paper. I put the Snowman tutorial on one side and the Thank you note on the other side. Then I laminated the cards, hole punched them and attached with a matching piece of yarn.
Well I am very behind in my blogging since the holidays so this week I intend to catch up and post a ton. Here is what is on our trays. Be sure to check back on Sunday to see what else we did this week (including Baked Cotton Balls!) We are reading Brown Bear, Brown Bear while learning about bears and the letter B. Come see what others have on their trays at H is for Homeschooling. OK so, I am way behind in blogging this week but I know some of you check in to see what is on our trays. I have also added some trays from our Mommy and Me Preschool Class this week because there were some really good trays this week. We did more but you'll have to check back on Sunday for our weekly recap post. Little Man turned three last Sunday. We celebrated with a visit from Nana. The family went to the zoo on Saturday. We had cake and opened presents on Sunday which was his birthday. On Thursday we celebrated in our Mommy and Me Preschool class and we will have his party this Sunday. Little Man has thouroghly enjoyed being the receiver of all this attention. On Saturday night I filled his room with balloons while he was sleeping and we hung streamers in his doorway. He was so surprised when he woke up. He LOVED it! Here are some photos of what we've been up to this week. My Little Man is turning 3 on Sunday. This makes for some changes around here. The first is the addition of Calendar time to our daily routine. The Princess has been doing calendar time at school for the last year and a half; now Little Man has shown an interest in days of the week, dates and time in general (I think thanks to the advent calendar followed by the count down to his birthday). I decided to start incorporating calendar time in at the beginning of our tot school sessions this week. This is definitely a work in progress and I hastily put together a "calendar time center" for us to use. I took a tri-fold display board I had used for another project and covered it with felt. I then made all the labels and pieces you see in the photo and laminated them (and attached velcro). I also included a weather chart from Confessions of a Homeschooler and a temperature chart I found through google images. (we've yet to use this.) On another note, I also used a printable from 1+1+1=1 to make the story retelling pieces for Jan Brett's, The Hat . I have really fallen in love with our homemade felt board. I read a tip about printing on milk filters (used in dairies) so my hubby bought me a box of 100 for Christmas. I just trim them down to paper size and they go right through our printer and I have instant color graphics the kids can manipulate. In addition to our tot school this week I've been busy making party favors for Little Man's birthday party which we are having next weekend. I am making "snowball in a can kits" and homemade "snowman wikki stix kits". I'll have another post on that when they are completely finished. Finally, we are in transition mode as I am trying to phase out the term "tot school" and start using "Preschool". (another change around here). We are already in a preschool co-op and a Mommy and Me Preschool class at our local adult school. Since the Princess is now with us two days a week and Little Man is turning three I figured we would change the name. His skills have also improved and we are ready to really focus on letter sounds, counting and learning to write our letters so it all just seems to suggest a preschool overtone. I will continue to utilize trays rather than boxes/ bins because that is what works for us. Before you take a look at the slide show with all our activities this week I just want to get this off my chest. My blogging pet peeve is when generous kind hearted people make their printables available to everyone but do not put their web site on them. It makes me crazy when I have to go back and try to find it again to include a link. Soo time consuming and some things I save for months. SOOOOO this week there are a couple that do not have links and I have included downloads to those in the resources section. If they happen to be yours drop me a note and I will add a link for them. Be sure to check out 1+1+1=1, preschool corner and the TGIF Linky Party to see what others are doing this week. I've added a Follow me on twitter button if you'd like to follow our journey. Well it was hard to complete winter/ snow activities when it was 80 degrees outside. We tried to take advantage of the warm winter weather and spent a lot of the week out side playing. Little Man is having a really rough time getting back into the swing of the tot school routine. I find he is easily distracted and wants to stop to 'play' often like when we first started doing tot school several months ago. Three weeks of no real routine has put us back at the beginning. We also have the Princess home with us now for two of our three tot school days so that has changed things a bit as well because my attention sometimes is divided between two activities/ kids. Little Man turns three this Sunday and I was planning to take a more preschool like route with him but I will have to build up his stamina and attention span again first. I think once we focus more on preschool activites vs. so much sensory play it will be easier to mesh the two kids activities together. The Little Princess has started reading so we are working on the "You can Read" printables from 1+1+1=1 and we are reading the Bob books as well as some beginning readers from Scholastic books. I am amazed at how fast she is picking up words. Little Man has mastered shapes, and colors, he has a strong sense of counting now (1-12) and can recognized almost all the upper case letters. I am going to start working on him with the lower case (he knows many) and on letter sounds. Here is what we did last week. We are easing backs into our routine this week. We have a new adjustment to make because I reduced the Princess to a three day school week and so she is home with us now on Monday and Friday so I have to have activities for her and the Little Man. So here is what we are working on this week. I can't wait to see what is in your workboxes or on your trays. Check out the new Linky at H is for Homeschooling (all about trays) and Be sure to link up at Workbox Wednesday! |






 RSS Feed